Sorry, but RSL-2702S 27" Heated Roller Laminator 1 /Each is no longer available to buy.
We think you might like one of these instead:
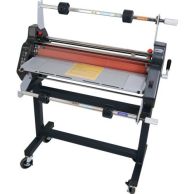

RSL-2702S 27" Heated Roller Laminator 1 /Each
- Capable of Thermal, Digital (Low Temp), & Cold Laminating
- Capable of Mounting (Up to 3/16")
- Variable Speed & Heat Settings
- Works with 1" and 3" Core Films
- 1 Year Manufacturer Warranty


Description
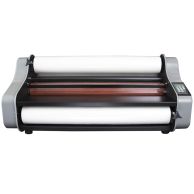
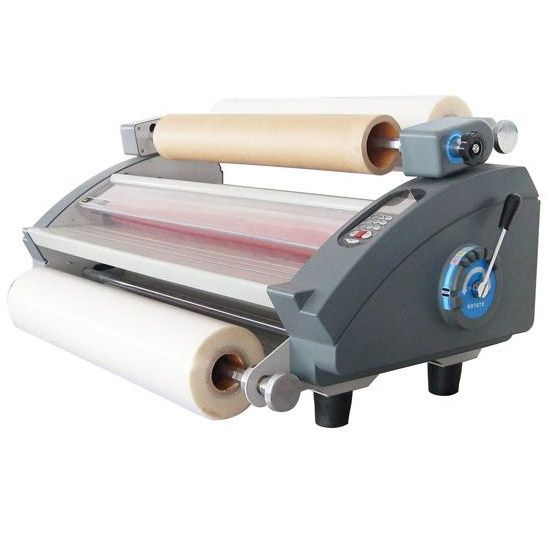
If you need a roll lamination machine that can do it all, allowing for so much more than just encapsulation, then the RSL-2702S from Royal Sovereign may be the best bet! Let's do a checklist of everything this machine can do, shall we? ✔ hot/thermal laminating, ✔ digital/low-temp laminating, ✔ cold/pressure sensitive laminating, ✔ single-side laminating, ✔ double-side/encapsulate laminating, ✔ 3/16" mounting, ✔ thermal foiling -- what other machine can do ALL of this?
In addition to the great versatility of potential applications, the RSL-2702S also offers the ability to use either 1" or 3" core films up to 5 mil thick. It can also occasionally accomplish 10mil*, however, with some special restrictions including only for short-runs and at slower speeds. The controls are simple and easily adjusted with the digital and touch-pad panel. The silicone rollers are of the highest quality, offering not only consistent heat, but also consistent pressure from edge-to-edge. These features combine to help to ensure an even and bright finish for every application that you run.
How to Load Film
As is true with any lamination machine, the first step is to load your film. Before you do this, make sure you choose a compatible lamination that is no wider than 27", has a 1" or 3" core, has a roll diameter smaller than 7.9", and is no thicker than 5 mil. Because this machine can do both cold and hot laminating, you can choose thermal or pressure-sensitive films. Once you have your laminate, here is how to install it on the RSL-2702S. Be sure to check our videos tab for help, as well as the official manufacturer's instruction manual, which offers these same instructions with drawings and figures.
Loading the Roll
- insert auto grips onto the upper/lower film shaft.
- using the special tool, fix the auto grips on the film shaft with set-screws.
- Set the glossy side of the upper and lower film towards the heat rollers. ( Glossy side is PET film and matte side is thermal polymer laminating adhesive)
- Center film
Threading/Webbing the Film (Thermal / Hot)
- Turn the power switch on("I" position). Power switch is located in the rear of the unit on the left side.
- Complete the "Loading Film" steps
- Set the temperature and speed according to the Recommended Temperature and Speed section.
- Remove the Front Table.
- Pull down the upper film over the Safety Cover to the lower film; align and center the lower film to upper film
- Rewind the upper film until the film aligns with the Safety Cover.
- Thread the film over the Upper Idle Bar and underneath the Safety Cover until the film rests on the upper roller
- Carefully pull up the laminate from the lower roll up towards the first idle bar and then around the back side of the second Idler (Caution: lower roller may be hot).
- Tack the lower film to the upper film that is resting on the main roller
- Reinstall the Front Table and close the Safety Cover.
- Adjust the nip setting to 1/4'' (6mm).
- Insert and push the leader boards on each end until boards reach the front nip point.
- Adjust the nip setting to "Laminating" mode.
- Push the Run button.
- Push the leader boards between the pair of main rollers
- Press the Run button and adjust the supply roll tension knobs by rotating clockwise or counterclockwise. Turn it until the supply roll films have some resistance (the tension varies depending on the film thickness; the thicker the film the more tension is required)
- Press Stop button when the leader board has completely exited the rear of the unit.
- Use the Cross Cutter to cut the leader board from the web
- Peel Trim any excess film off of the leader board edges. The leader board can be reused.
- Set the roller nip setting to the appropriate position for the lamination or encapsulation application.
Threading/Webbing the Film (Cold / Pressure Sensitive)
- Follow the steps in the "Loading Film" procedure by loading the upper shaft with pressure sensitive film, and lower shaft with pressure sensitive mounting adhesive films or backing paper
- Pull the upper laminate under the upper idle bar and separate the release liner from the laminate.
- Tape the release liner to the Take-Up Paper Core and allow the laminate to hang over the main rollers.
- Pull up the mounting adhesive and tack it to the laminate hanging over the rollers (do not use the Lower Idle Bar).
- Reinstall the Front Table, and close the Safety Cover.
- Adjust the nip setting to 1/4"(6mm).
- Insert and push the leader board until board reaches the nip point.
- Press the Run button and adjust the supply roll tension knobs by rotating clockwise or counterclockwise. Turn it until the supply roll films have some resistance (the tension varies depending on the thickness of a film; the thicker the film the more tension is required).
- Press Stop button when the leader board has completely exited the rear of the unit.
- Use the Cross Cutter to cut the leader board from the web.
- Set the roller nip setting to the appropriate position for the lamination application.
Mounting
- Lay the decaled image face down on a flat surface. Carefully peel back and put a crease along the edge of the release liner (Approximately 1 inch)
- With the image facing up, align the image onto the board. Press firmly from the center out
- Adjust the pressure lever to ensure the proper opening
- Flip the image over the upper roller and hold on to the release liner
- Press the Run Button , and then press the Stop Button while the board has being completely exited from the rear of the unit. Trim the board if necessary.
Single-Side Laminating
- Turn the power switch on("I" position). Power switch is located in the rear of the unit on the left side.
- Follow the steps in the "Loading Film" procedure by loading the upper shaft with OPP Film.
- Set the temperature and speed as: Temperature (Upper roller:110-130oC;Lower roller:35oC) and Speed 5-8.(It may damage the paper to laminate by single side while the rollers up and low are heating all together.)
- Center the OPP film.
- Thread the film over the Upper Idle Bar and underneath the Safety Cover until the film rests on the upper roller.
- Pull a sheet of A3 paper into the laminating roller and pass between the idle-bar and shaft-decurling. Make sure the idle-bar being in the lower location while laminating.
- Link the paper to the film.
- Adjust the nip setting to "Laminating" mode.
- Push the Run button. You must pull the film on the rear of machine avoid entangling while being out of machine.
- Cutting down the side film then the paper can level off.
- Stop the laminator when all of the items have completely exited the rear of the machine.
- Please loose the film tension as loosed as possible.
- Clean the Roller just as the film stick to the roller and influence the quality of coating.
* Royal Sovereign indicates a maximum mil thickness of 5 mil for this machine, however, a 10 mil is possible as well; they recommend only running 10 mil films for shorter runs and using the slower speed settings. It is not listed as the maximum thickness because of these special run-requirements.
Specifications
| Item # | 04RSL2702S |
|---|---|
| Manufacturer | Royal Sovereign |
| Manufacturer Part Number | RSL 2702S |
| UPC/EIN | 849023070191 |
| Power Voltage | 120V, 60Hz, 1500W |
| Dimensions | 38" x 22" x 19" |
| Certifications | UL |
| Manufacturer's Warranty | 1 Year Limited (Parts & Labor), 6 Month Rollers |
| Size | 27" |
| Color | Gray |
| Operation | Electric |
| Double-Sided Lamination | Yes |
| Single-Sided Lamination | Yes |
| Thermal Laminating | Yes |
| Digital Laminating (Low-Temp) | Yes |
| Cold Laminating | Yes |
| Speed | 8.2' / Min (Feet per Minute) |
| Adjustable Speed | Yes (9 Settings) |
| Heating Type | Silicone Rollers |
| Warm-Up Time | 10 Minutes |
| Maximum Mil Thickness | 5 Mil (10 Mil is Possible with Special Run-Settings*) |
| Temperature Range | 68°- 302° F (20°- 150°C) |
| Adjustable Temp | Yes (9 Settings) |
| Maximum Roll Length | Maximum 7.9" Diameter Rolls |
| Core Size | Works with 1" and 3" Core Films |
| Programmable | 9 Programmable Memory Settings |
| Reverse Function | Yes |
| Capable of Mounting | Yes |
| Maximum Mounting Thickness | 3/16" Boards |
| Capable of Foiling | Yes |
| Compatible Foil Core Size | 3" Core |
| Maximum Foil Roll Width | 27" |
| De-Curling Device | Yes |
| Integrated Cutter | Yes |
| Document Guides | Yes |
| Liner Take-Up | Yes |
| Stand-By / Power-Save Mode | Yes |
| Auto-Shut Off | Yes |
| Shipping Weight (lbs) | 190 |
| Product Weight (lbs) | 154 |
| Shipping Dimensions | 45" D x 30" W x 21" H |
| Shipping Information | This item ships via Truck (Common Carrier). It is the responsibility of the Consignee (receiver) to remove the product from the truck. If you do not have a loading dock or any other means to lift the freight off the truck and/or you need assistance bringing the product inside of your location please contact us. Click here for full details. |
Videos
Royal Sovereign RSL-2702 27" Heated Roller Laminator: Main Features
Royal Sovereign RSL-2702 27" Heated Roller Laminator
Reviews
Frequent Asked Questions
Submit a New Question